QUICK PALLET MAKER EXAMPLES
Basic Calculations
Handling Results
Container Fill Examples
Special Requests
Rectangular Packages into Pallets
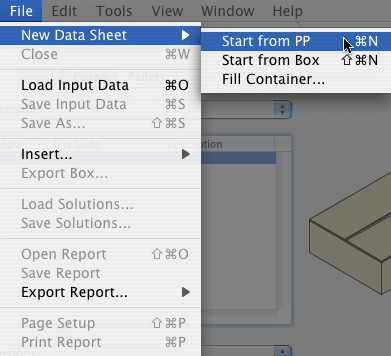
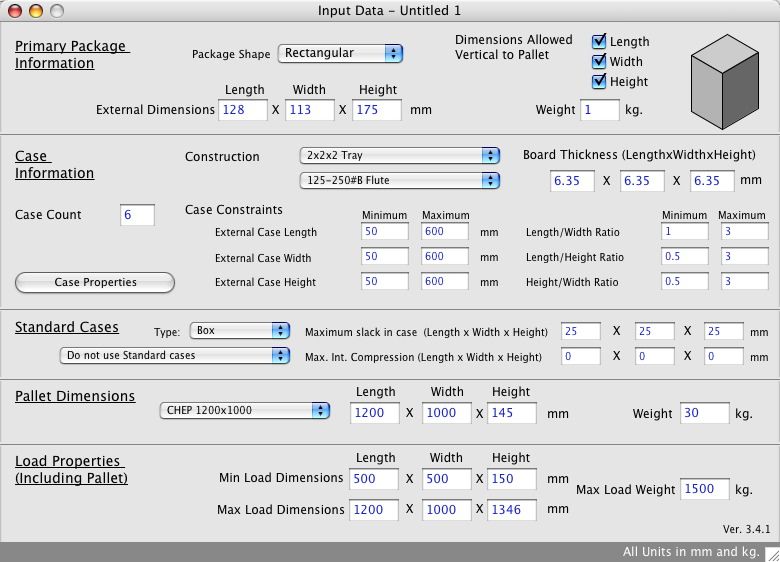
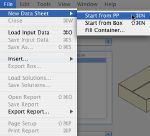
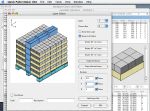
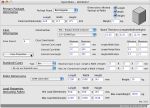
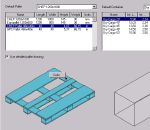
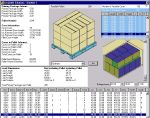
| The first example describes how to calculate pallets using the default data that is contained in the Input Window. The first step is to run Quick Pallet Maker and to open a new document starting from the Primary Package. Select this feature from the File menu. |
 |
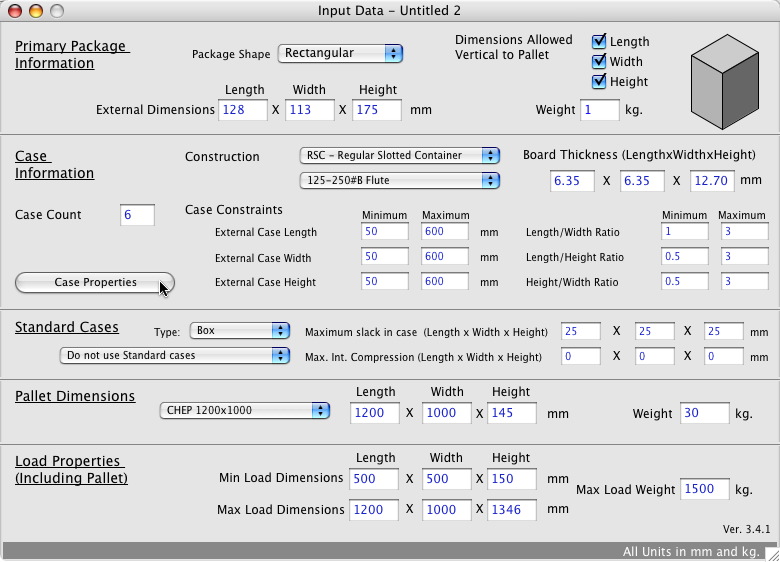
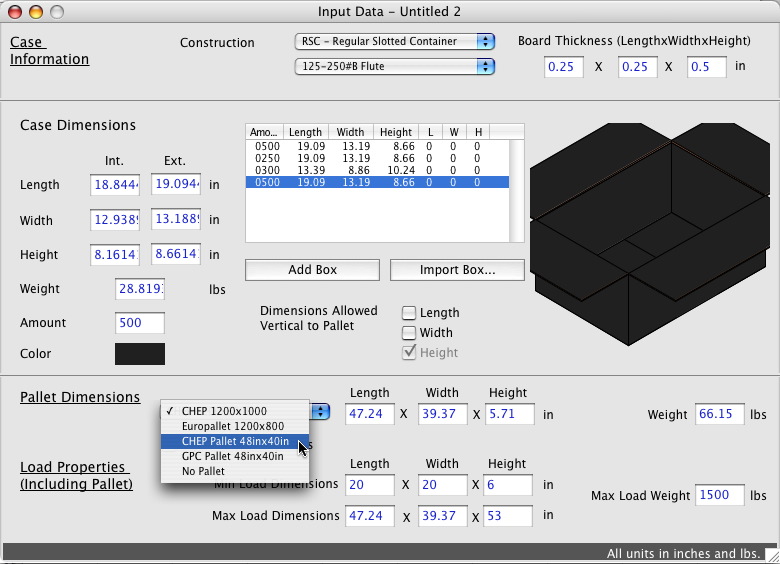
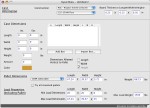
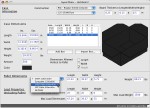
| When the window is opened, a set of data will appear that refer to a primary package with a rectangular form (i.e. a carton or square bag) with the following dimensions: 128x113x175 mm. QPM will calculate the size of the boxes that will be used to pack these primary packages, besides orienting them in the pallets similar to the one that has been selected in the image at right. |
 |
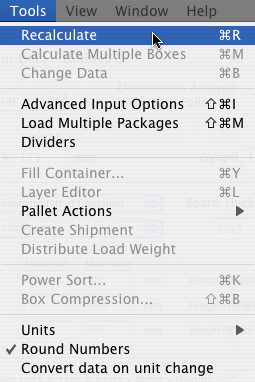
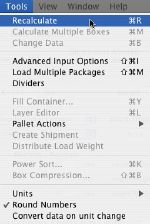
| Once that all of the data has been introduced (like in this example in which we did not change anything), we use the Recalculate function to obtain a list of results. This feature is located under the Tools menu. |
 |
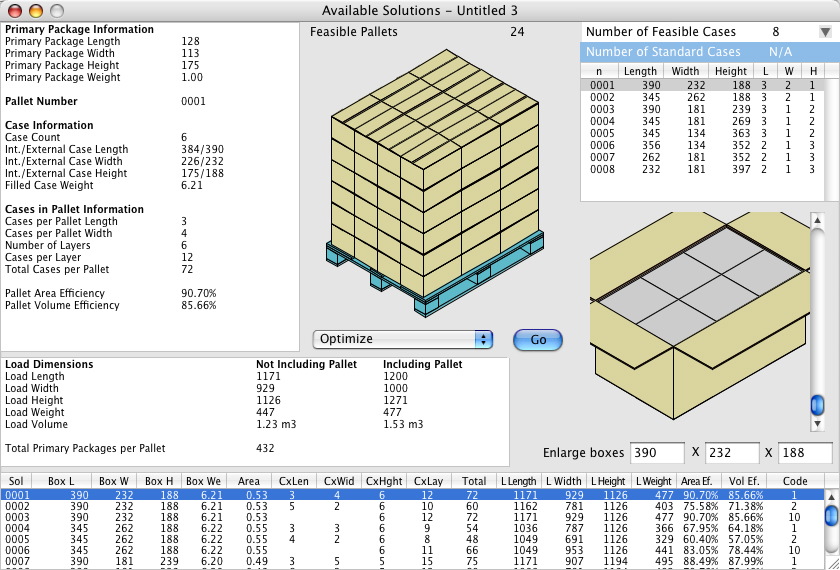
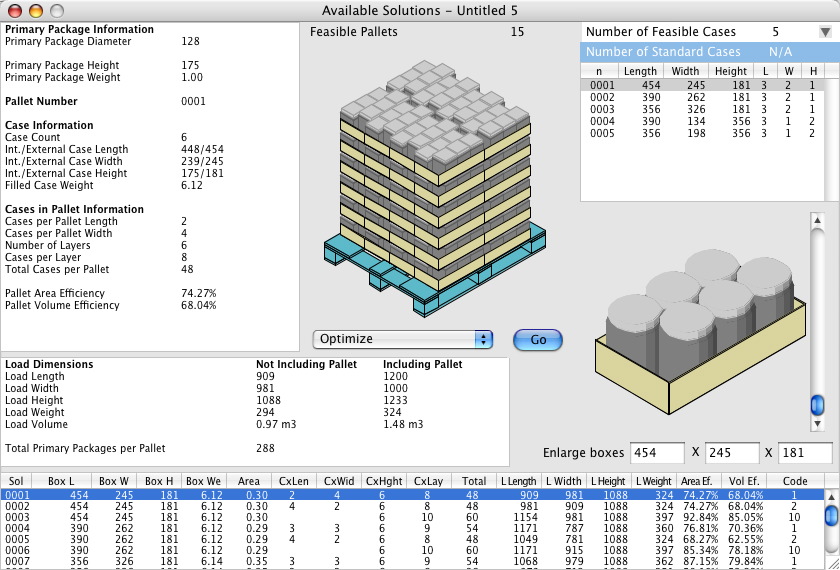
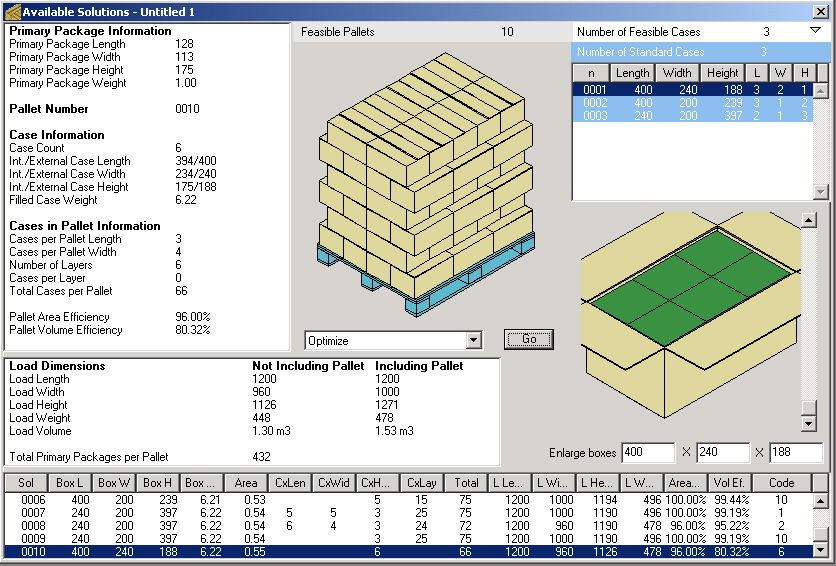
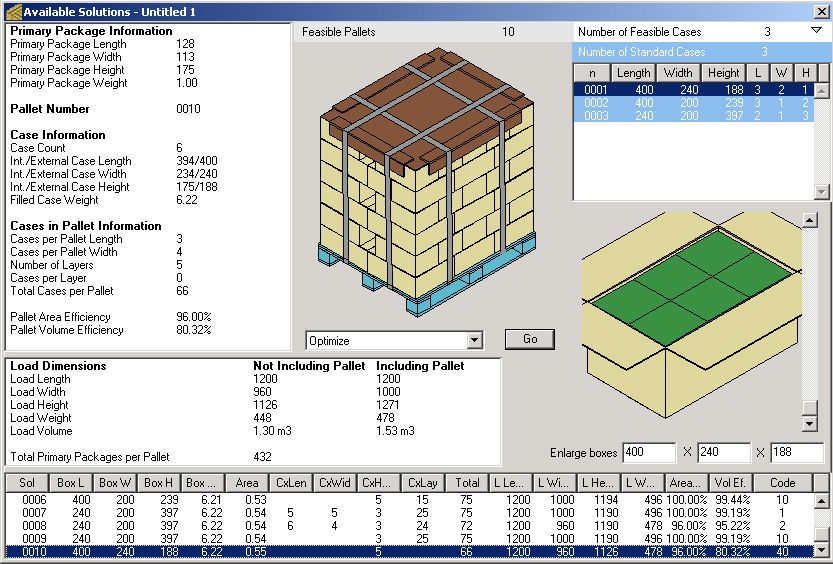
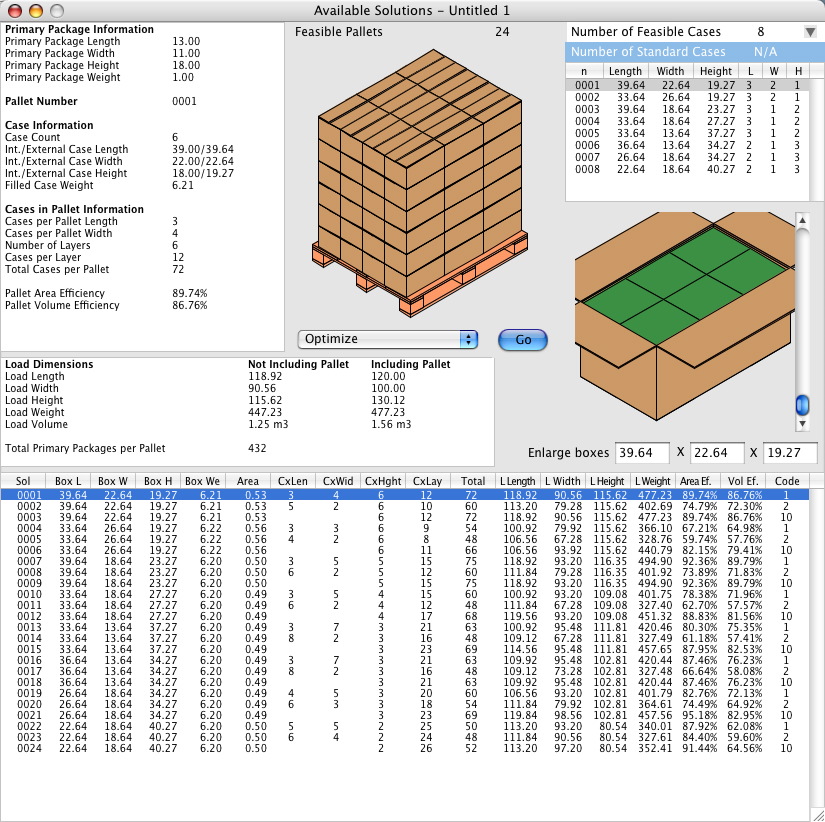
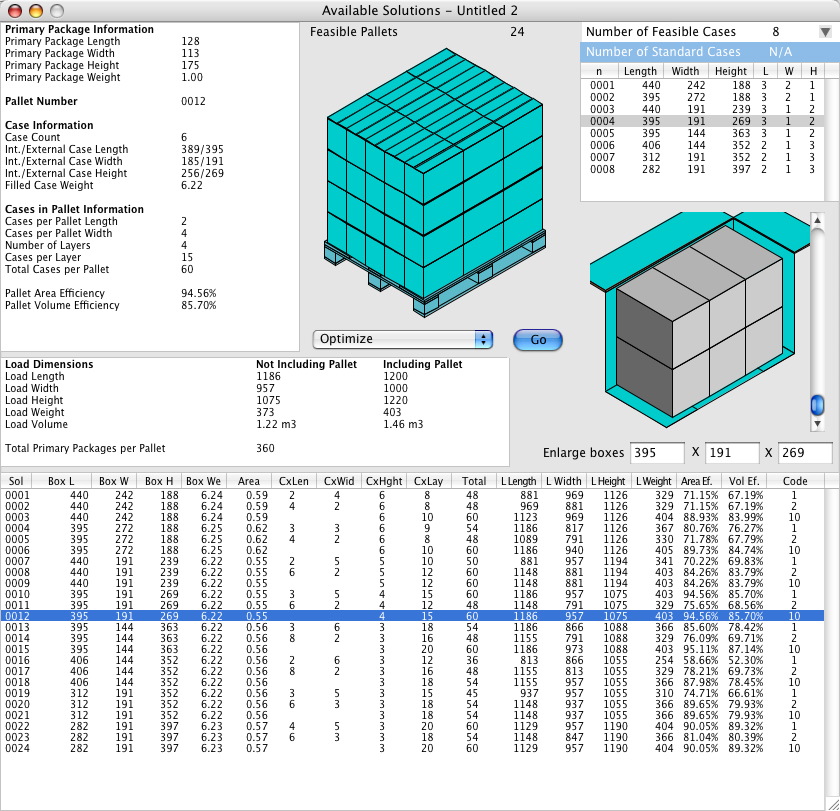
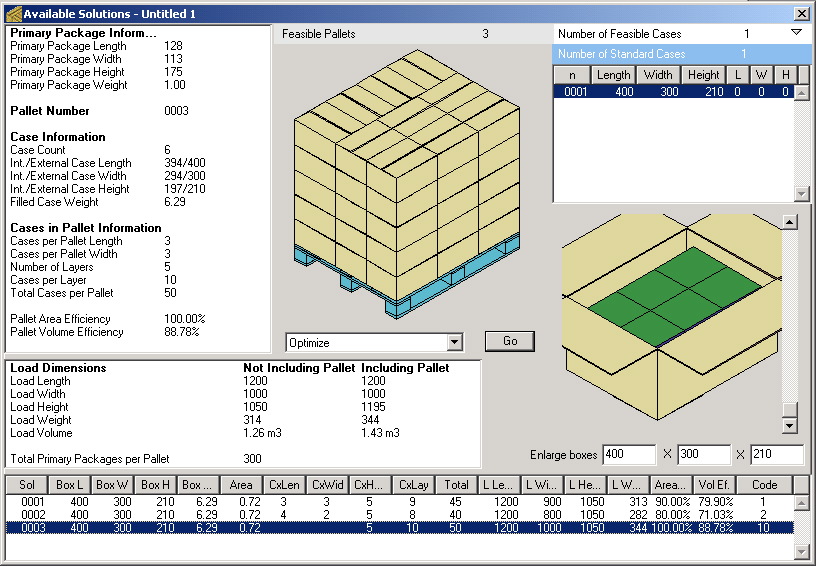
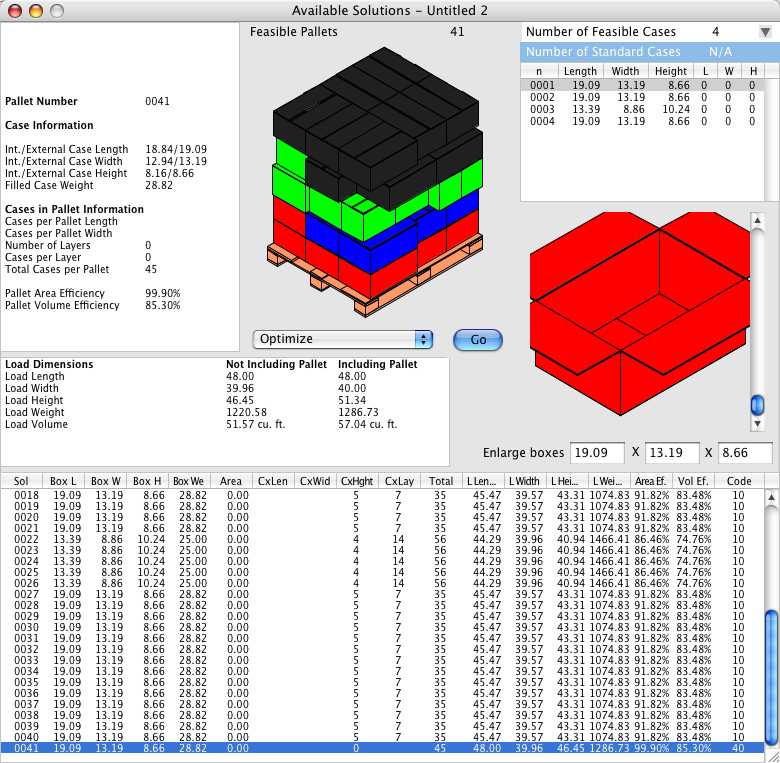
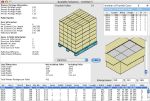
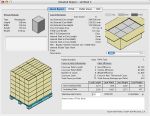
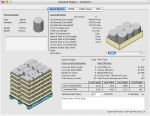
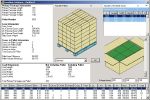
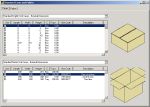
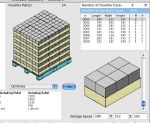
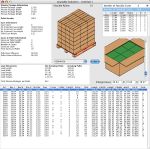
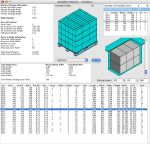
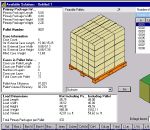
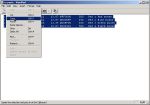
| After the program has finished calculating, we should see a window with a list of boxes at the right side of the window and a list of pallets at the bottom of the window. The details of the selected pallet will appear on the left side of the window. In this example, we have selected the pallet with the greatest area efficiency. |
 |
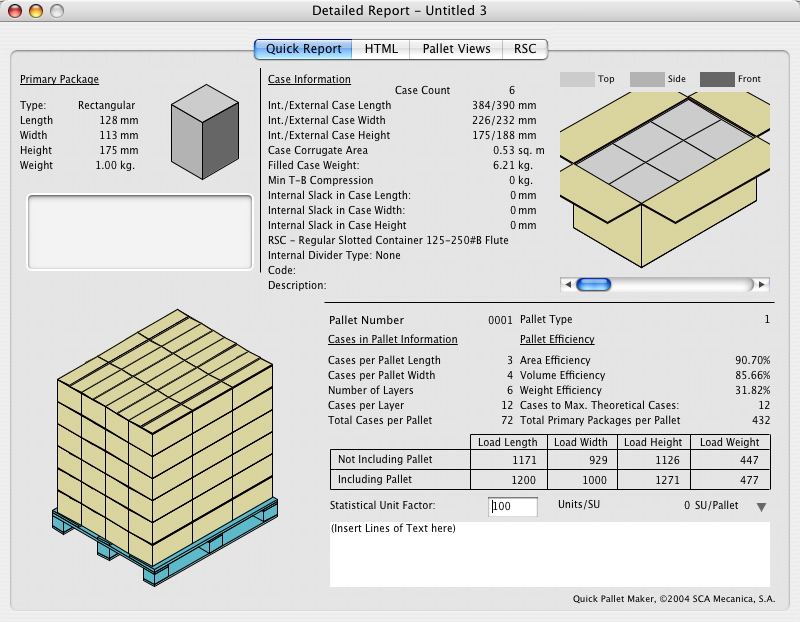
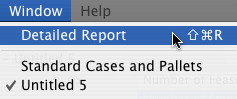
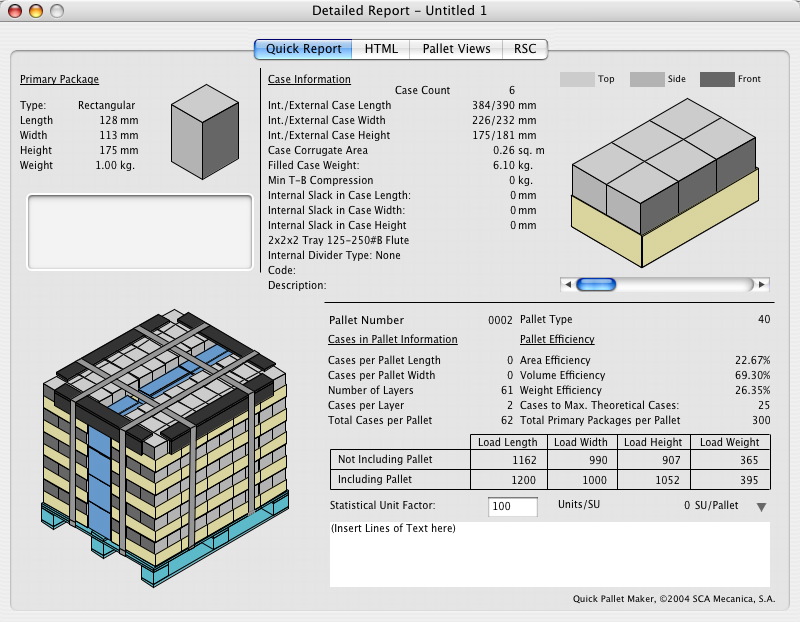
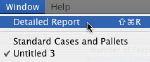
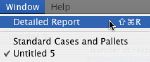
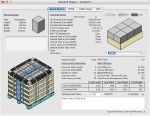
| In case the user wishes to print the pallet data, he/she must select the "Detailed Report" item that is located under the Window menu. |
 |
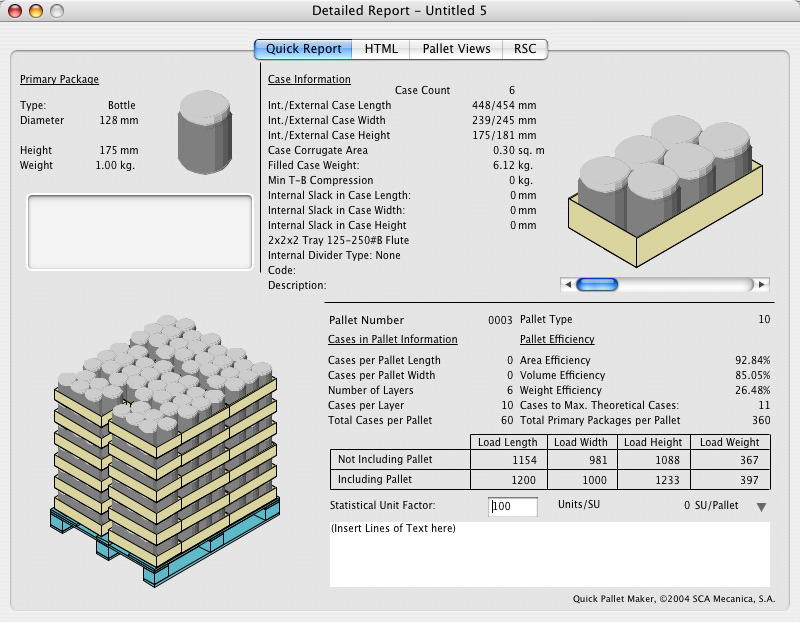
| A window like the one at right will appear. This report contains all the information regarding the pallet that was selected and about its boxes. In case we have different boxes in the same pallet, these can be seen by moving the selector at the bottom of the drawing. |
 |
| Top |
|
Bottles in Trays and Pallets
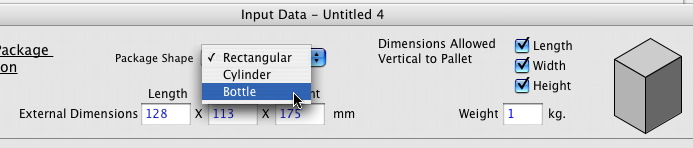
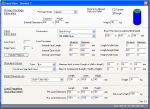
| This example deals with the inclusion of different bottle shapes into a open tray and then into a pallet load. The first step is to open a new document window and change the package type to "Bottle". |
 |
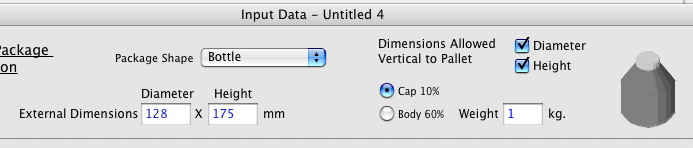
| Once this is done, we will see the bottle drawing. We will change the bottle shape and convert it into a jar with a screw-on cap. |
 |
| To change the shape, first we click on the "cap" button and drag the mouse sideways to change the cap diameter and vertically to change the cap height. Then, we click on the "body" button to change the height of the rest of the bottle. Note that when the cap and the body proportions are increased, the neck proportion is reduced. The movie to the right shows how this is done. |
 |
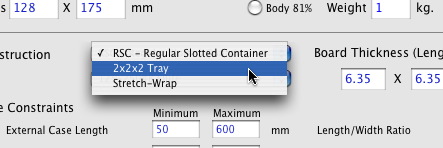
| The next step before calculating is to select "2x2x2 Tray" from the Box Construction menu. Note that this example will only work as explained if the rest of the input data is consistent with the default values. |
 |
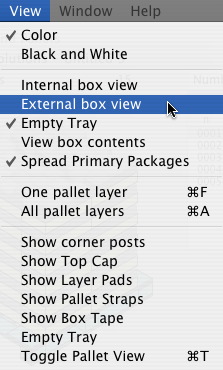
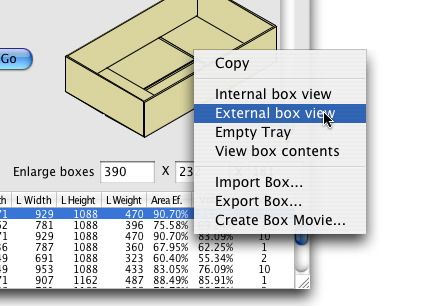
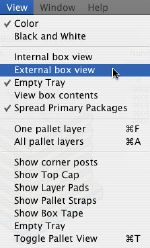
| Then, we use the Recalculate command from the Tools menu to see the resulting pallets. To see the trays correctly, we may need to select "External box view" from the View menu. Other tray view options include only primary packages, empty tray and section view. |
 |
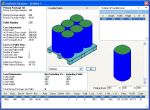
| Once this is done, our results should look like in the screenshot at right. |
 |
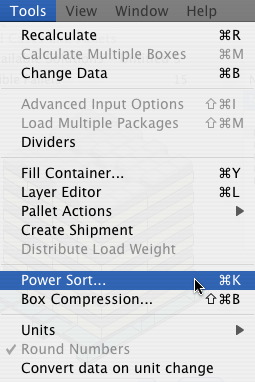
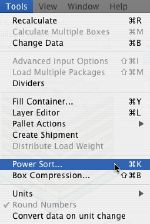
| Since we want to find the optimal box and pallet arrangements, we will need to order the pallets. For this, we select "Power Sort..." from the Tools menu. |
 |
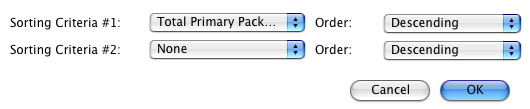
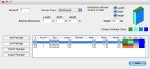
| A small window will appear in which we introduce the sorting criteria. In our case, we will sort by the amount of primary packages per pallet in a descending order. |
 |
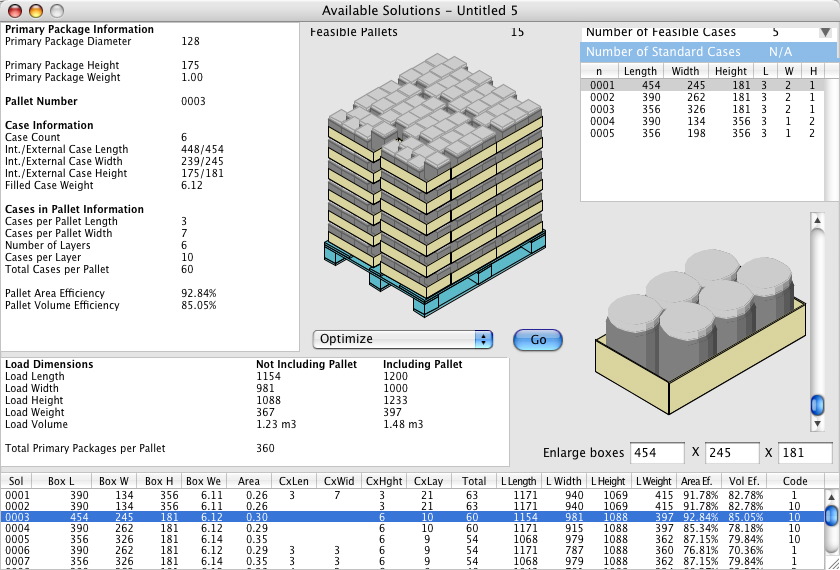
| Once this has been done, we will see the best pallets in the first rows. We select the third pallet because it uses a box arrangement that doesn't stack the bottles/jars on top of each other. |
 |
| Once the pallet has been selected, we choose "Detailed Report" from the Window menu. |
 |
| This opens up a new window from which we can see the pallet, box and primary package information. |
 |
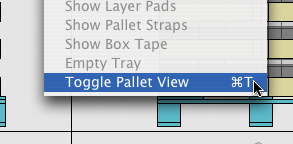
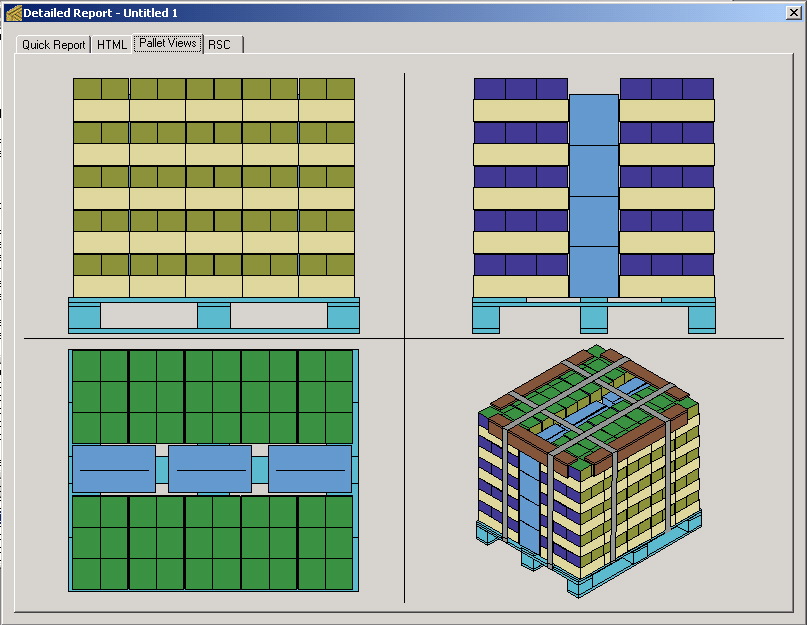
| If we want a bigger drawing of the pallet, we can click on the "Pallet Views" tab and then use the Toggle Pallet View command from the View menu to go through the different pallet drawings. |
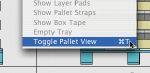 |
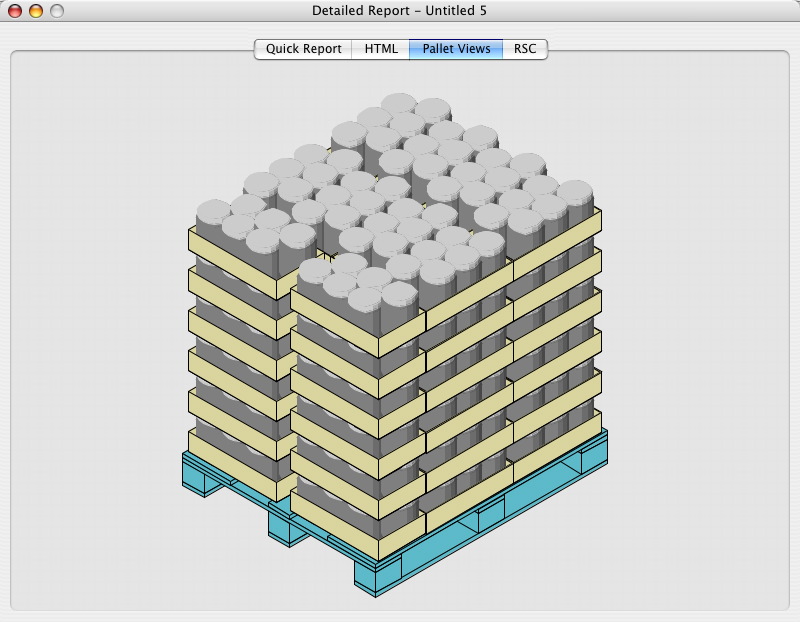
| If we select "Toggle Pallet View" enough times, we will see the 3D pallet drawing in a large size. |
 |
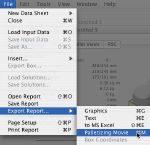
| Another possibility for viewing the pallet loading mechanism is to use the Palletizing Movie export feature that is available from the File menu. This process will ask first for the name of the movie file and then for the QuickTime movie compression settings. The "animation" setting produces good movies that take up little disk space. |
 |
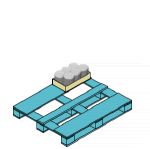
| The resulting movie should look similar to the one at right. |
 |
| Top |
|
How to use standard cases
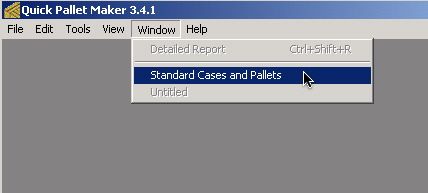
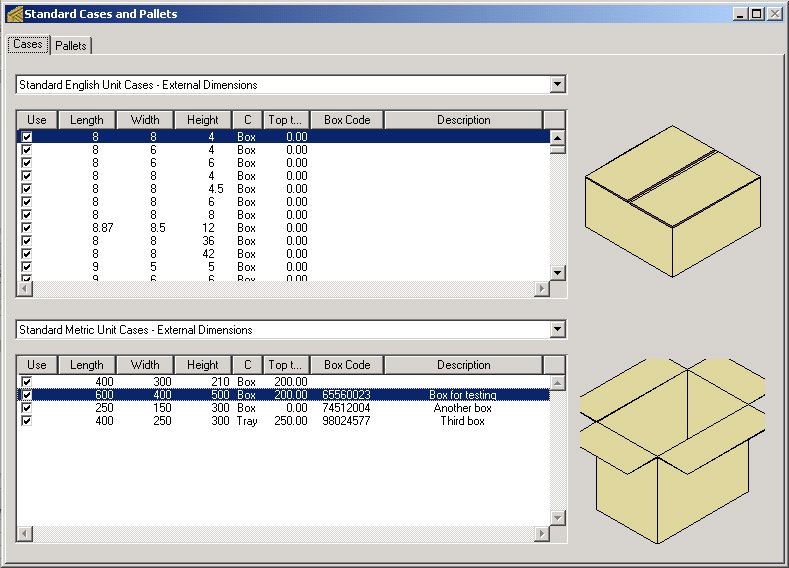
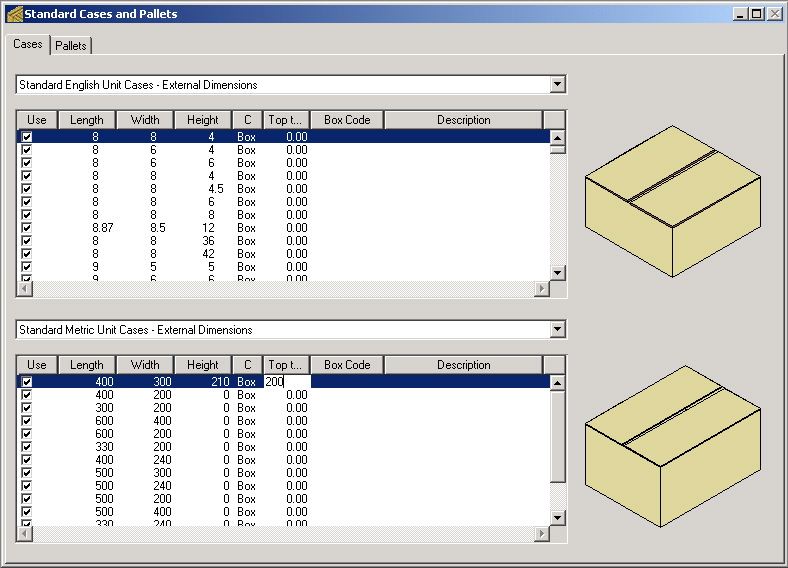
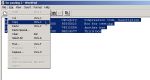
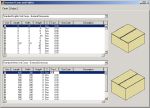
| This example deals with the utilization of boxes with standard dimensions (off-the-shelf boxes). The standard box list is located in a special window where boxes can be added or removed. To see this window, select "Standard Cases and Pallets" from the Window menu as in the graphic at right. |
 |
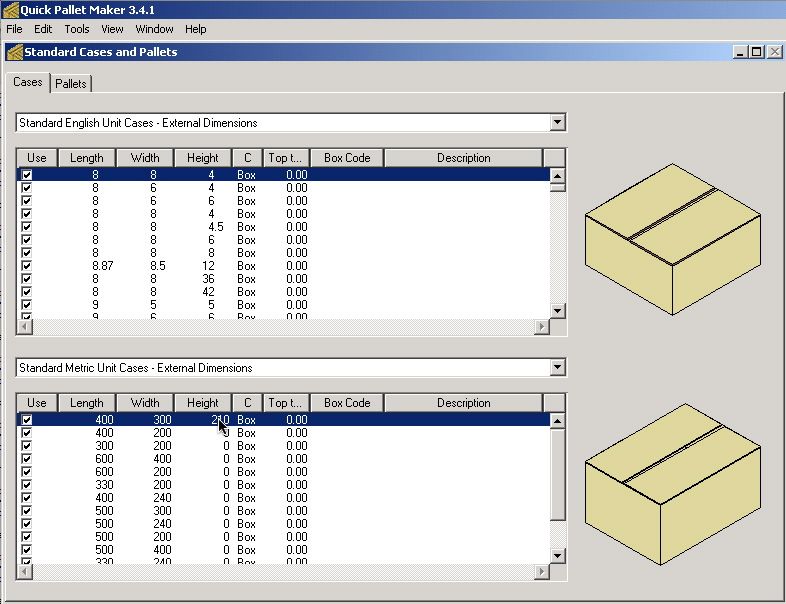
| In this window, you will be able to add, edit, disable or remove standard cases. To add a box, select one and then use the "Duplicate" item in the Edit menu. This will create a new box at the bottom of the list. To edit the box dimensions, select it from the list and then double-click it. To disable a box, deselect the checkbox that is located left of the dimensions. To remove a box from the list, select it and then use the "Clear" item in the Edit menu. |
 |
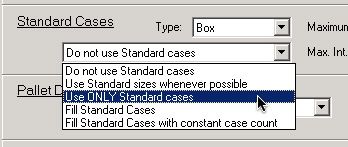
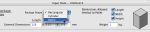
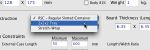
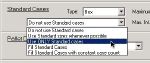
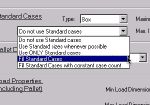
| The next step is to open an Input Window starting from the primary package and selecting "Use ONLY standard cases" from the central menu in the Input Window. |
 |
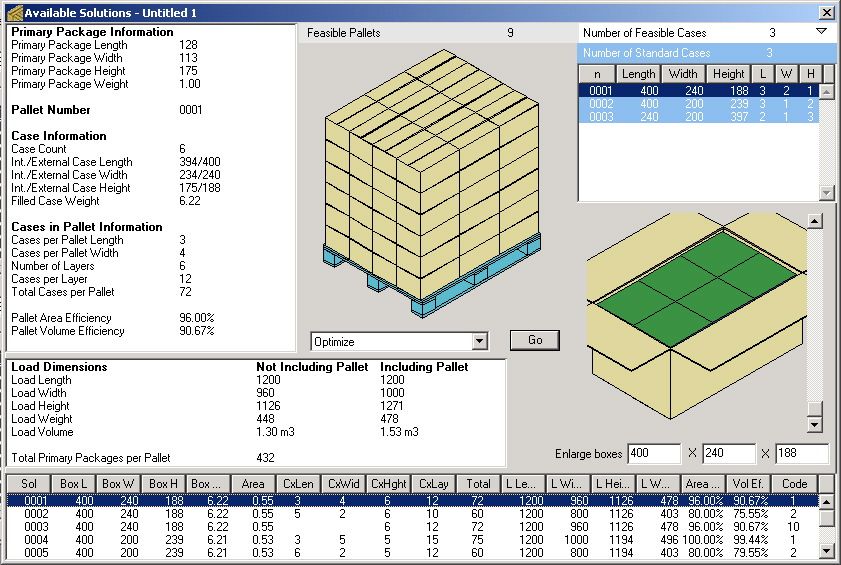
| After using the Recalculate function, Quick Pallet Maker will generate a list of standard boxes and pallets that were generated with this input data. |
 |
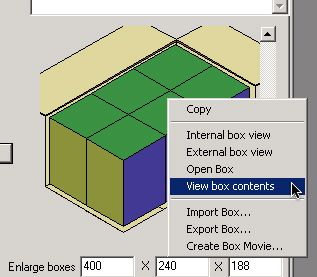
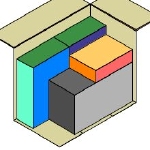
| Although not apparent in the box view, QPM has added slack to the packages in order to use the standard cases. In other words, the load is "loose" in the case. The "View Box Contents" option is useful for showing this slack inside the case. |
 |
| Another way to enter the standard case dimensions is to copy the data from a spreadsheet application (such as MS Excel) or from any text file that contains columns separated by tabs. In this part of the example, we will delete the cases that we do not need by selecting them first... |
 |
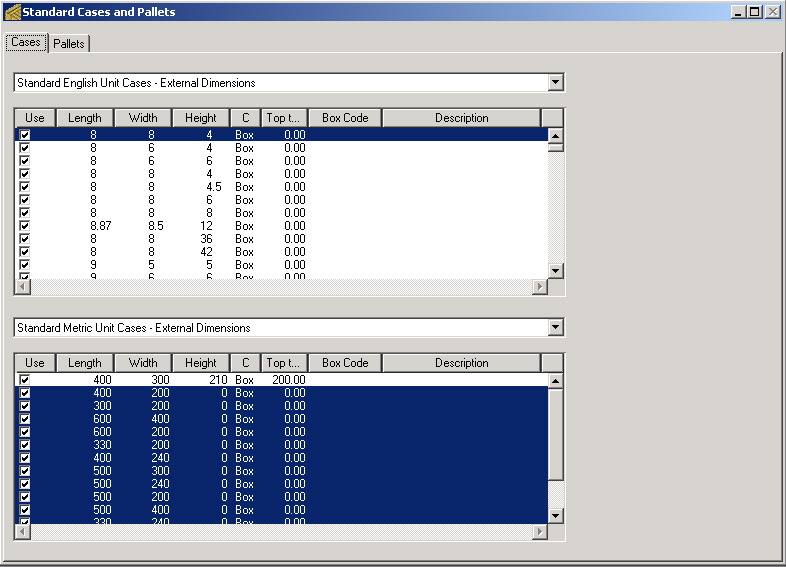
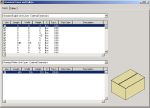
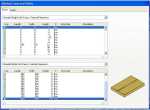
| ...and then clicking on the "Del" or "Backspace" key (Windows) or on the "Del" or "Delete" key (Mac OS). The resulting list (we are working with metric units in this case) should look like the one in the screenshot at right. |
 |
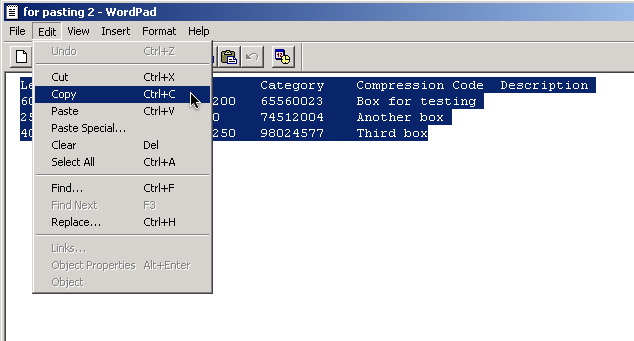
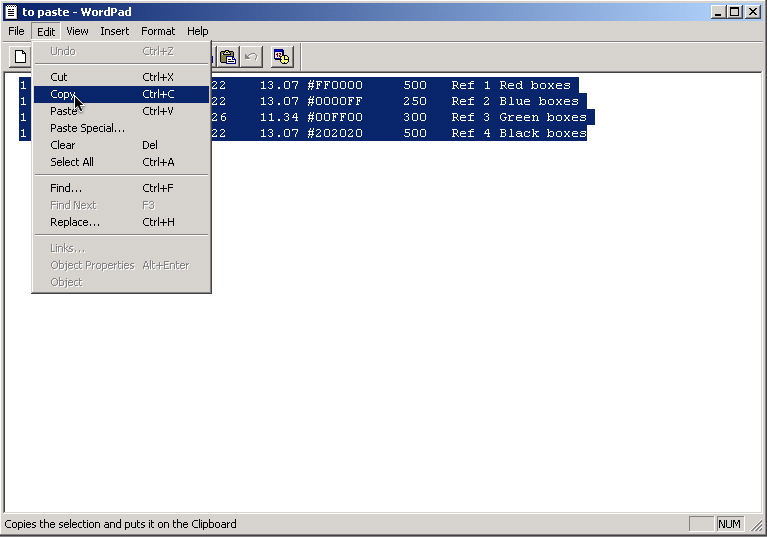
| The next step is to grab the tab-delimited text from a document. In this case, we are copying it from Windows Wordpad, which is included in the most recent Windows OS versions. We select the "copy" command to bring the text onto the clipboard. The order of the columns is the following: Box Length, Width, Height, Category (the type that will appear in the standard cases menu), Top to Bottom Compression, Code and Description. |
 |
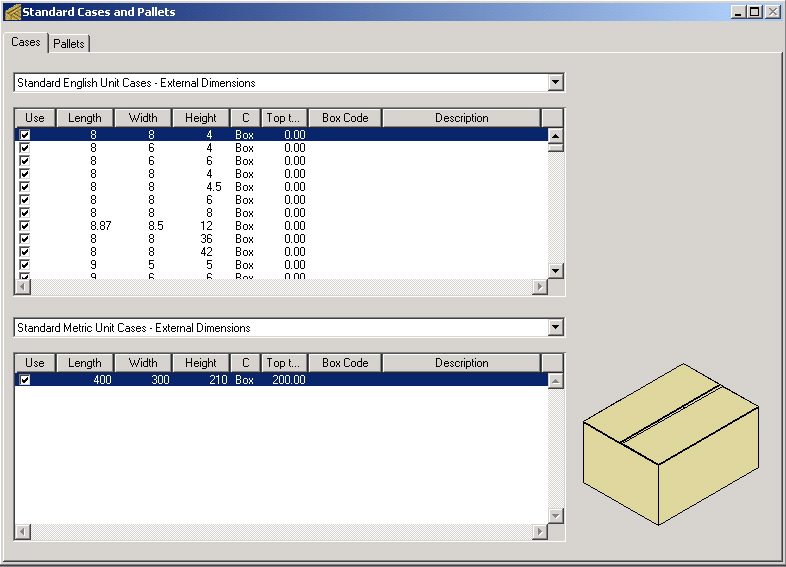
| Once we are back into QPM (please remember to not click on the whitespace in the table), we can paste the data and the result should look like in the screenshot at right. |
 |
| Top |
|
Alternating pallet layers
| To alternate the levels of a pallet that has been created with Quick Pallet Maker, we start from the list of pallets that was created following the same procedure as the example #1. The result should be similar to what we see at right. |
|
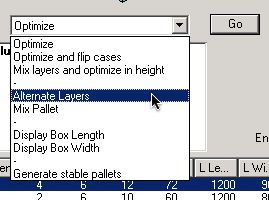
| Once this is done, we select the first of the pallets in the list and the Alternate Layers function from the main pallet actions menu. In order for this action to be executed, the user needs to press the "Go" button. |
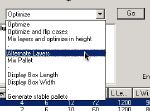 |
| Once the pallets with alternated layers have been calculated, a new pallet will appear at the end of the list. The drawing at right shows this new pallet. |
 |
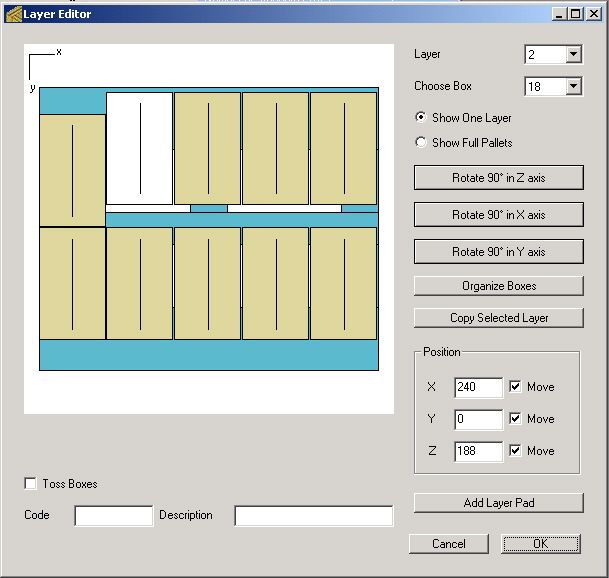
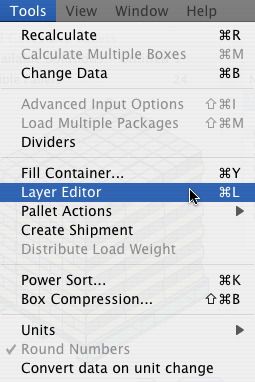
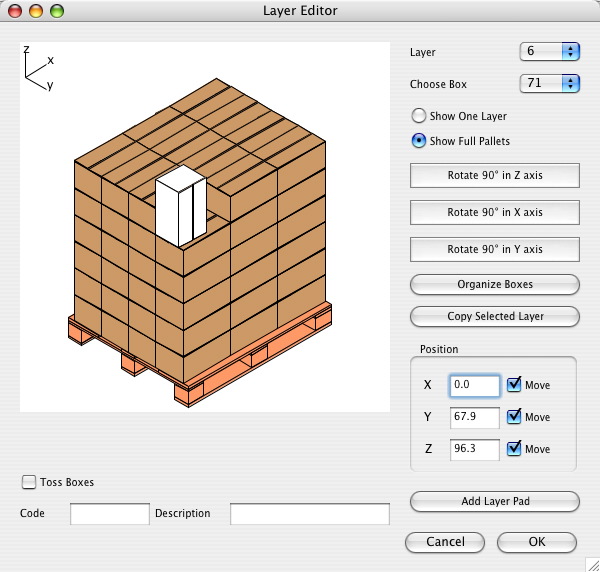
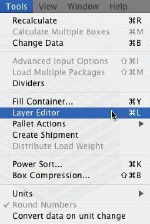
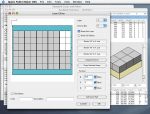
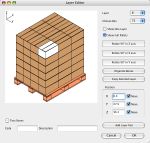
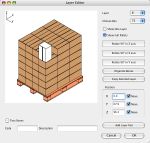
| The problem with this pallet is the instability. The levels don't keep the same area between them, which makes the pallets prone to collapsing. Besides, this pallet does not optimize the boxes per pallet but that argument is beyond the scope of this example. In order to add stability to the boxes, we will open the Layer Editor, that can be found under the Tools menu. Once this window has been opened, we select the second level which is the first one of the levels will less area utilization. |
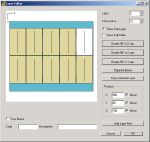 |
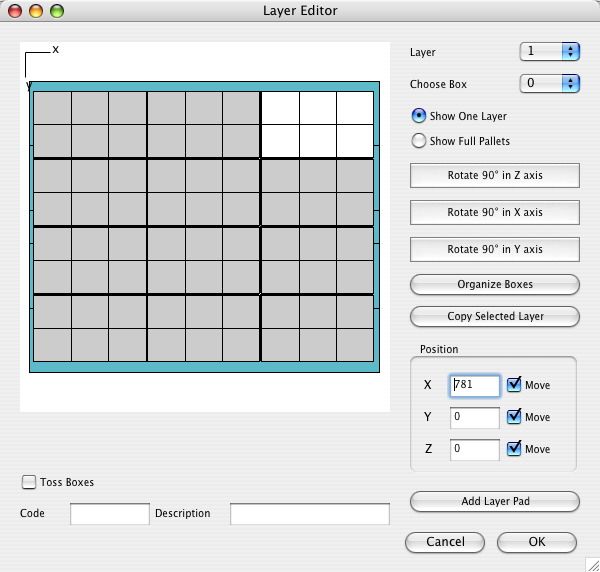
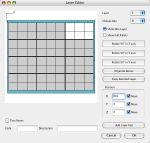
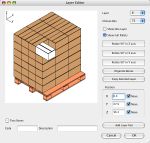
| One by one we will change the box coordinates on the pallet width so that their corners touch the corners of the layer below. Specifically, we will assign a value of y = 0 to the ones that are located in the uppermost section in the screen and a value of y = 929 -390 = 539 to the boxes that can be seen at the bottom of the screen. |
 |
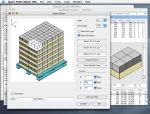
| We repeat this procedure with all of the interleaved levels until the resulting pallet looks like the graph at right. In this case, corner posts have been placed along with a pallet cap (using the features under the View menu) in order to add stability to the load. |
 |
| Top |
|
Box Compression Calculation
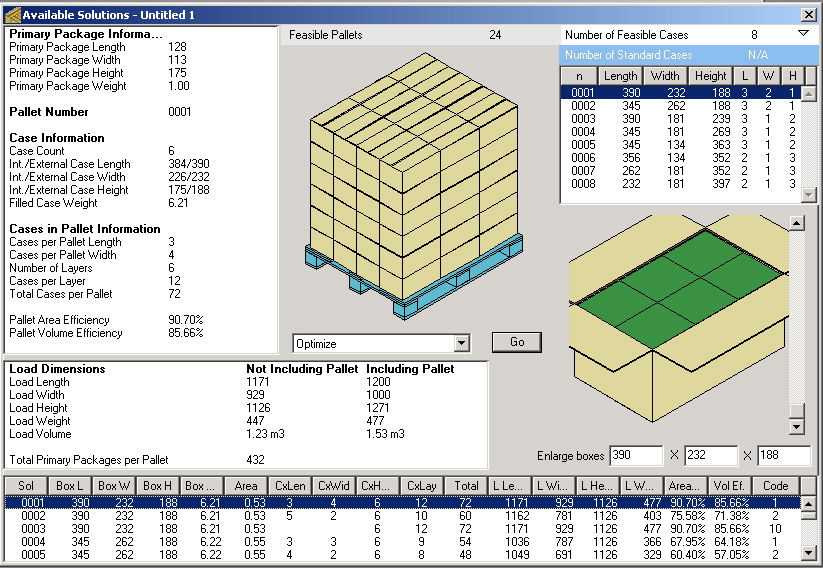
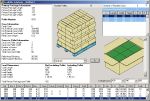
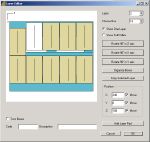
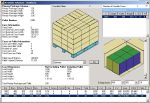
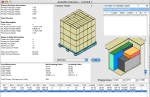
| The purpose of the box compression calculations is to indicate to your box supplier the force that you will need your desired boxes to withstand, based on the pallet arrangements you have obtained with QPM. The process is very straight-forward. In this example, we have already calculated the pallets using the default data and we should see the solutions window like this. |
 |
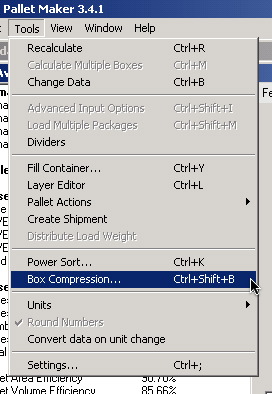
| The next step is to select the first pallet on the list and then open the box compression window by selecting the appropriate command from the Tools menu. |
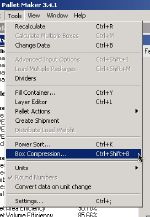 |
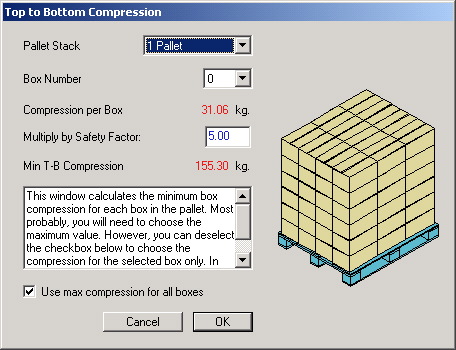
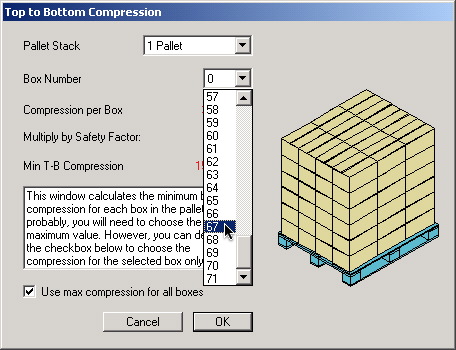
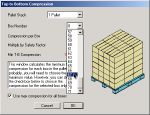
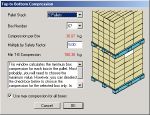
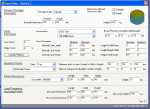
| The box compression window should look like the one in the screenshot at right. From top to down, the controls are: pallet stack selector (for indicating how many pallets will be stacked on top of each other); the box selector (for comparing compression values across boxes in the same pallet); the weight each box stands, the safety factor and the compression force including the safety factor. The default values indicate how much is the minimum weight that the bottom box (box #0) should resist. |
 |
| If we use the box selector, we can choose another box in the pallet. |
 |
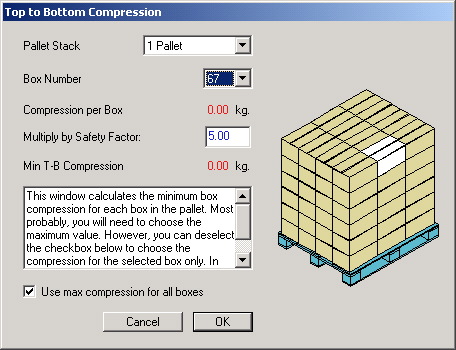
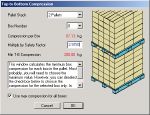
| For example, if we choose one of the top boxes (painted white), we will see that the minimum resistance is zero. That's because they do not have any boxes on top. |
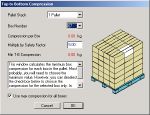 |
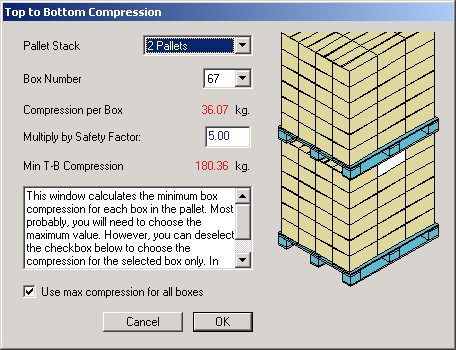
| We can also choose to add another pallet to the stack and we will know that the compression resistance needs to be greater in case that we will stack pallets in a container or warehouse. |
 |
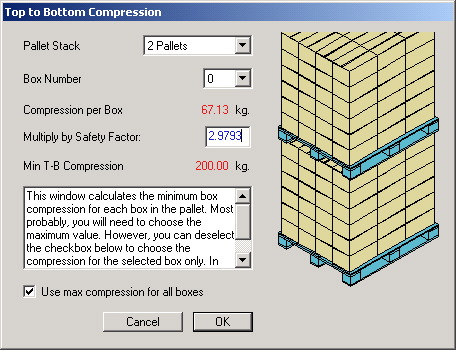
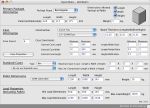
| In this screenshot, we are fiddling with the safety factor. Note that the safety factor depends on the stacking and warehouse conditions and that unless you are well understood in this matter, you should contact your box supplier for guidance. |
 |
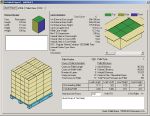
| Once we have clicked on "OK" and closed the box compression window, we can open the Detailed Report window from the Window menu. We will see that the compression value for all of the boxes has been updated to reflect the calculation result from the Box Compression window. If we had unchecked the "Use Max compression for all boxes" box, we could be able to scroll through the different boxes in the pallet and find different values. This last option is useful in case we had unused boxes hanging around in the warehouse with a lower compression strength and we could use them for the upper layers. |
 |
| Top |
|
Using the Pallet Layer Editor - Part I
| The following screenshots and movies illustrate how the pallet Layer Editor can be used to move, add and remove boxes on a given load. In this first part, we will see how the boxes can be moved around and how we can select different layers. The first step for running this quick tutorial is to run QPM and open a new window starting from primary package dimensions. The only difference with the default data will be to select "2x2x2 Tray" instead of RSC in the box construction menu. Once that has been changed, we select "Recalculate" from the Tools menu. |
 |
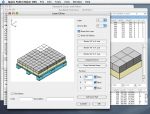
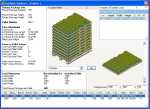
| The resulting window should contain a list of pallets at the bottom that contain different tray arrangements, the information for the selected pallet at left, the pallet drawing in the center and the list of available trays at right. In case the box drawing shows an empty tray, we can click the drawing with the right button (on a Windows PC) or ctrl+click (on a single-button Mac) to change the box view. |
 |
| The updated box drawing should look like the one in the screenshot at right. |
 |
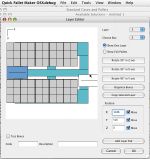
| The next step is to select "Layer Editor" from the Tools menu. This will show the Layer Editor window, from which we can change the position and the orientation of the boxes in the pallet. |
 |
| If we selected the first pallet from the list, the Layer Editor window should look like the one in the screenshot at right. |
 |
| The QuickTime movie at right shows how the Layer Editor is used for viewing the different pallet layers. The top menu can also be invoked through Ctrl+(layer number) for Windows computers and Command+(layer number) for Mac OSX. |
 |
| For the movie at right, we have closed the Layer Editor window without saving the changes (clicking on "Cancel"), selected the second pallet from the list in the Solutions Window and then opened the Layer Editor again by using the appropriate command from the Tools menu. The purpose of this animation is to show how the user can drag the selected box and restrict the axii in which the said box can be dragged. Note that the movie shows how the box is dragged in the xy plane. However, dragging boxes is possible in all three planes from the views that are perpendicular to them. The plane will be represented in the quadrant marker in the top-left corner of the drawing. |
 |
| This last animation shows how a box can be flipped in any of the three axii. Note that the box will only be flipped if there is space available. Otherwise, a clicking sound will be heard and the box will remain in its original position and orientation. For example a box in the bottom row usually needs to be moved out from below the other boxes to flip it. |
 |
| Top |
|
Using the Pallet Layer Editor - Part II
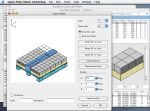
| These screenshots explain how the Layer Editor can be used for mixing different boxes in the same pallet with custom configurations. In this case, the shipper wants to send a pallet with trays and blue boxes to a customer. The customer requested 48 trays and as many blue boxes they could fit. To do this, we start from the previous example and select the second pallet from the list. Then, we select "Layer Editor" from the Tools menu to see the top-most view in the Layer Editor. |
| The animation at right explains how the first part of the example is executed: first, we move the boxes at the bottom of the view further away from the rest of them to make a space in the middle. This is done by changing the "y" axis values. Next, we rotate the pallet view and make sure that the rest of the layers adopt the changes. Then, we will import saved boxes (click here to download the file) and fit them in the space between the tray rows. The final step is to click on "Organize Boxes" to update the drawing. |
 |
| After completing the last part, the first pallet row should look like the one at the beginning of this movie. The next step is to duplicate the first layer across the available pallet height (data taken from input) and then click on the "Organize Boxes" button to update the drawing. |
 |
| After the first layer with mixed boxes has been duplicated, we notice that the middle boxes stick out because they're taller than the trays. For the example, this affects the placement of the pallet straps. Hence, we will need to remove the top boxes. For this, we move the pallet view, select each box and then the "Clear Box" command. Once this has been done, we save the pallet rearrangement and add the pallet straps to give it its final look. |
 |
| We can choose to look at the detailed report to be able to print out the pallet and box data. Other report options are also available. |
 |
| From the detailed report, we can choose the "Export Palletizing Movie" option from the File menu. This option will create a QuickTime movie like the one that can be opened through the screenshot at right. |
 |
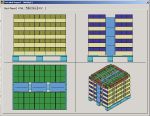
| This last screenshot contains the four drawings from the Pallet View tab. The same example has been calculated with another computer. |
 |
| Top |
|
Exporting Box Coordinates
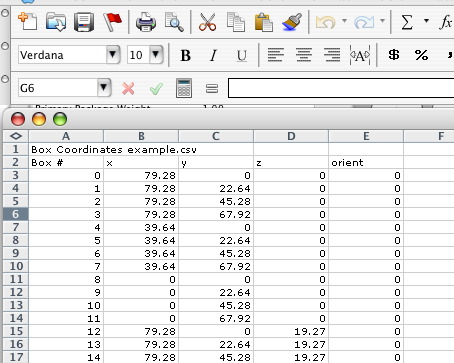
| There are occasions in which users will want to export the box placement data from Quick Pallet Maker to an automatic/robotic palletizer or other machine/software. For this, QPM produces a list of the box x,y,z coordinates and the box orientation in a comma-delimited text file. |
| For this example, we will calculate pallets using the default data. The resulting Available Solutions window shows a list of pallets from which we select the first one. |
 |
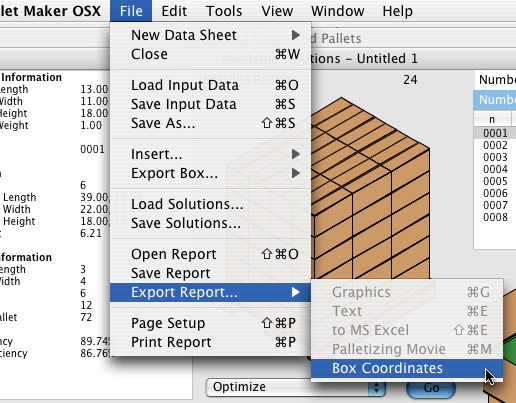
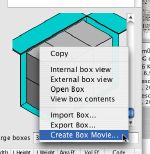
| The next step is to select "Export Report - Box Coordinates" from the File menu as in the screenshot to the right. |
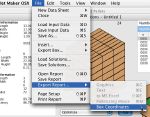 |
| The screenshot to the right shows how the comma-delimited case data looks when opened with Microsoft Excel. The first column contains the box number, starting from zero to count-1. The next three columns contain the x,y,z coordinates of the bottom-top-left box corner. The fifth column contains the box orientation (explained below). The white boxes show the different available orientations in Quick Pallet Maker. Note that orientations 1 and 2 (right-side-up) are the most used. |
 |
| Orientation = 0 |
Orientation = 1 |
Orientation = 2 |
 |
 |
 |
| Orientation = 3 |
Orientation = 4 |
Orientation = 5 |
 |
 |
 |
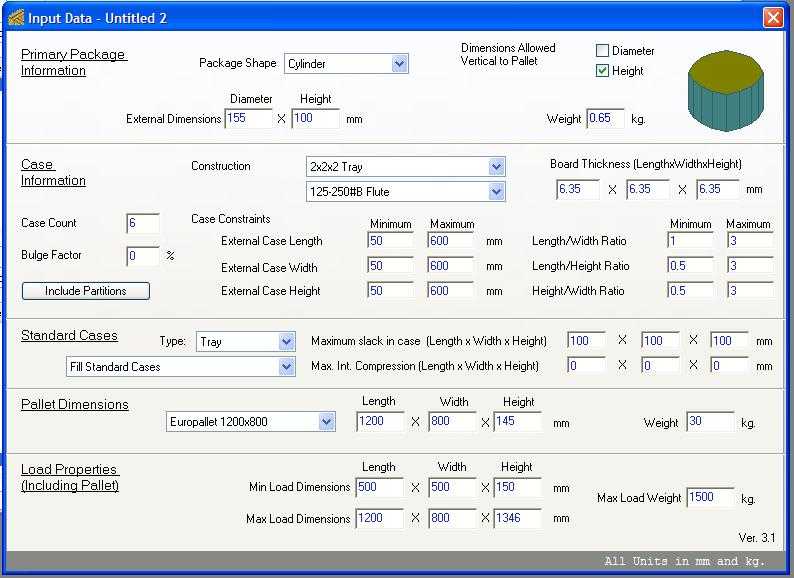
Filling a large tray with cylinders
| A customer wants to pack 155x100 mm cylinders onto pallets but wants to do it in such a way as to fit as many as possible per layer without any constraint on delivering a specific number to each client. In other words, he wants to ship bulk cylinders somewhere. There is more than one route to solve this problem. However, we will start by creating a standard case will the same area as the shipping pallet (1200x800) and with a height small enough to fill only one layer of cylinders. Note that we changed the category from "Box" to "Tray" to differentiate it from the rest of the boxes, saving time. |
 |
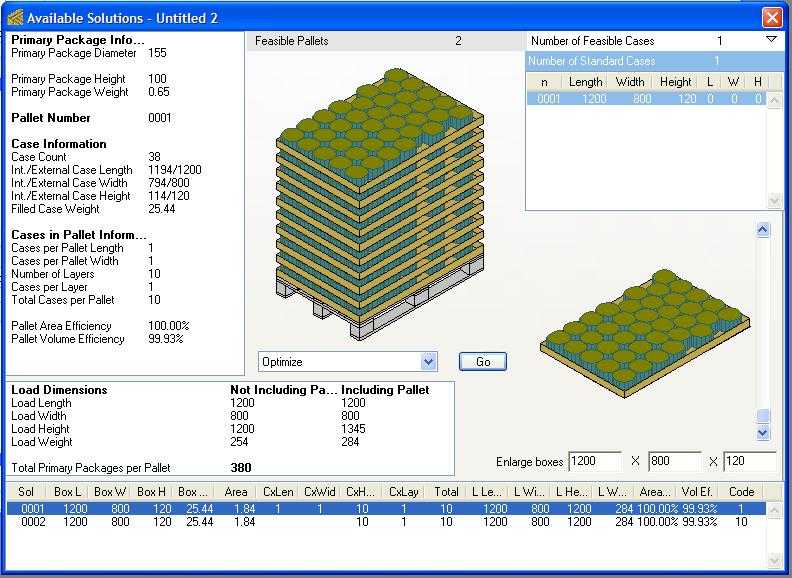
| Once this has been done, we open a new input window and enter the cylinder information and the specifications for our standard tray. Note that "Tray" has been chosen as the box category along with the "Fill Case" option. |
 |
| After selecting "Recalculate", we should see the pallets that were created with these specifications. |
 |
| Top |
|
Adding Slack to Different Case Sides
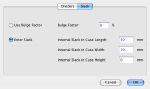
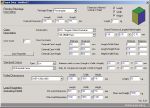
| This example is relatively quick. In some cases, a user will need to pack a product or a number of products into a box while using padding. Quick Pallet Maker allows the padding to increase the box dimensions differently in each axis. The first step is to open a new window starting from primary package dimensions. We will use the default dimensions. Then, we click on the "Case Properties" button. |
 |
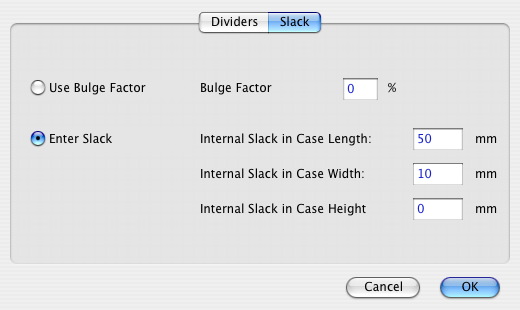
| Once we're in the Case Properties window, we click on the second tab to see that we can either enter the added padding dimensions as bulge (proportional to the box size) or as absolute values for each axis. In our case, we will use 50,10 and 0 mm for the internal slack in the length, width and height, respectively. After entering the values, we click on OK. |
 |
| The next step is to select "Recalculate" from the Tools menu. This will show us the resulting pallets and the boxes they contain. If we look at the boxes with the "Show Contents" view, we can see the slack that was added in each direction. |
 |
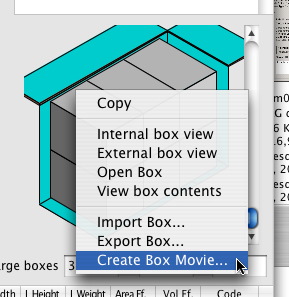
| Finally, Quick Pallet Maker offers the option to create a movie of the box fill. This animation will allow viewing the location of each one of the packages inside the box. |
 |
| You can click on the image at right to see the box movie. |
 |
| Top |
|
Using Standard Cases With Compression Limit
| This example, although easy to explain, is very useful when using standard cases that you already have in your warehouse. When this is the case, they have a certain maximum compression strength that they can stand. Hence, it doesn't make sense to create a pallet arrangement that would make the cases collapse and/or damage the products. Quick Pallet Maker calculates the optimal pallet arrangement with the compression already in mind. |
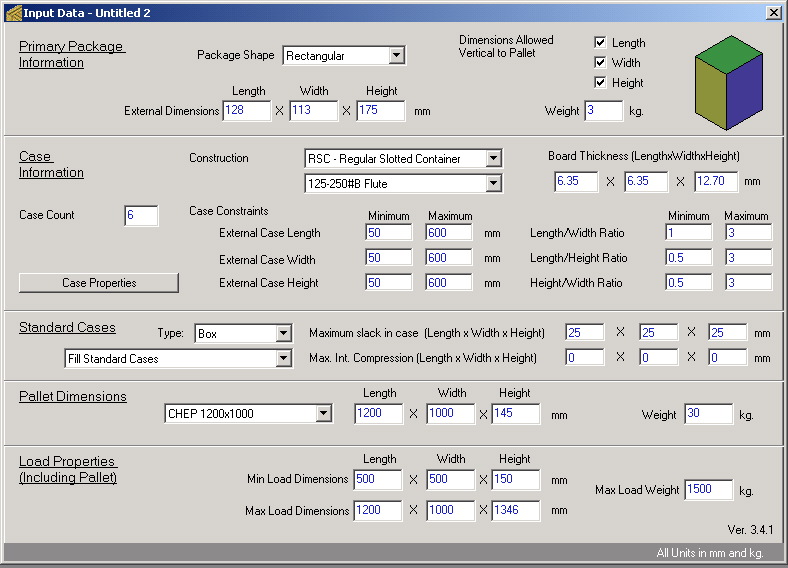
| The first step is to run QPM and open the Standard Cases and Pallets window by using the command that is available in the Window menu. Once this has been done, we will select a box in the bottom list (metric units) and enter its dimensions as 400x300x210 mm. This is done by double-clicking on the text cell. Then, we add a maximum Top to Bottom compression value of 200 kg. |
 |
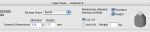
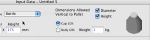
| Once the box has been entered, we open a new document window starting from primary packages. We will use the default data. In case you have turned auto-save on and you cannot see the default dimensions, open the Preferences window ("Options" from the Tools menu for Windows computers), then deactivate the auto-save option and then open a new window starting from PP. The next step is to increase the PP weight to 3 kg and select "Fill standard cases" from the menu near the bottom. |
 |
| After selecting "Recalculate" from the Tools menu, we will see that the resulting pallet orientations are somewhat shorter than the ones we usually obtain from calculating with the default dimensions. This is because QPM has taken into account the maximum T-B compression of the standard case, divided it by the default safety factor and used is as part of the stacking criteria. To change the default safety factor, you need to open the box compression window, change it, close the window and calculate again. |
 |
| In the screenshot at right, we have changed the safety factor from 5 to 3 and as a result, we can fit more rows onto the pallet. If we were to reduce the safety factor more or simply make the T-B compression value equal to zero in the Standard Cases and Pallets window, the load height would be limited only by the constraints that were set in the input window. |
 |
| Top |
|
Changing Pallet Colors
| When using standard pallets, you may want in some moments to use a different color for each of the different types of pallets. The process is described below. |
| Open the Standard Cases and Pallets window and click on the second tab to see the pallets and containers. After selecting a pallet, click with the right button (ctrl+click on a Mac) on top of the drawing to select a pallet color. |
 |
| Then, when you open a new window and select that pallet, you will see that the color matches the one you selected previously. The other pallets will continue having their previous colors. |
 |
| Top |
|
Using Drums as Boxes
| In one of the container load examples, we fill a container with pallets, boxes and drums. The following example explains how to save a drum as a box after calculating a pallet load. |
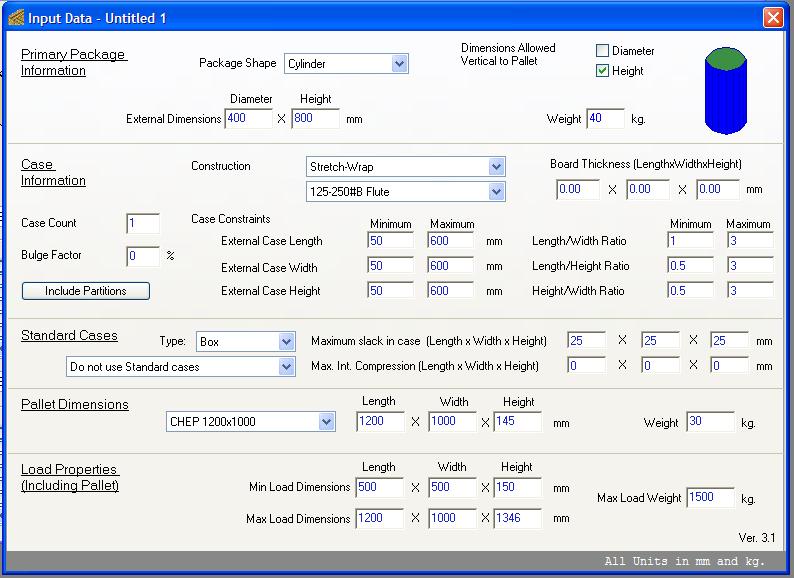
| The first step is to open a new document window starting from primary package dimensions and select "Cylinder" as the primary package type. Once this has been done, we choose "Stretch-wrap" as the box construction type and a case count equal to 1. The pallet constraints are not relevant as we will use the calculation to save the box only for further use. |
 |
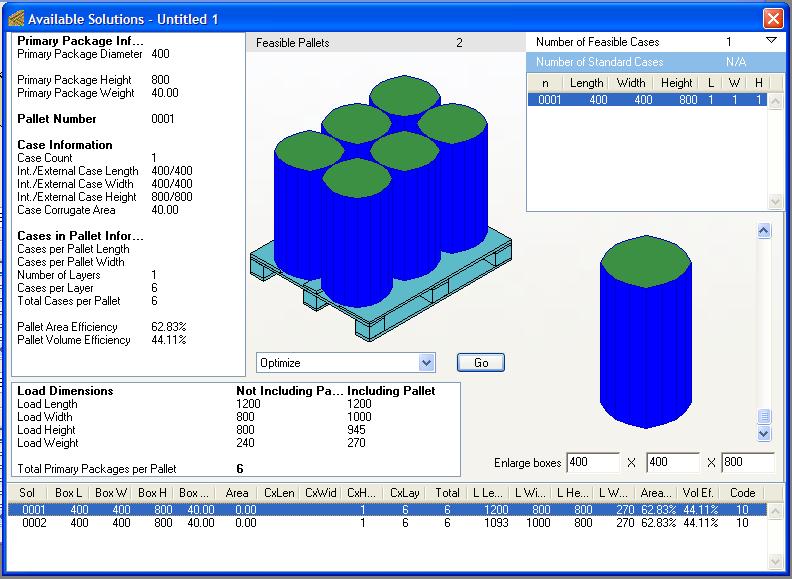
| After selecting "Recalculate". we should be able to see how the cylinders were placed on a pallet. Once this has been done, we can save the "box" to a file either using the Export Box... File (XML) command from the File menu or right-clicking (ctrl+click on a Mac) on the cylinder drawing. Once the box is saved, we can use it as in this example. |
 |
| Top |
|
Pasting Box Data for Pallet Calculations
| In one of the container load examples, we paste the box data from a spreadsheet or a text file in which the data is delimited by tabs. This now can also be done through the Start From Box dimensions window. |
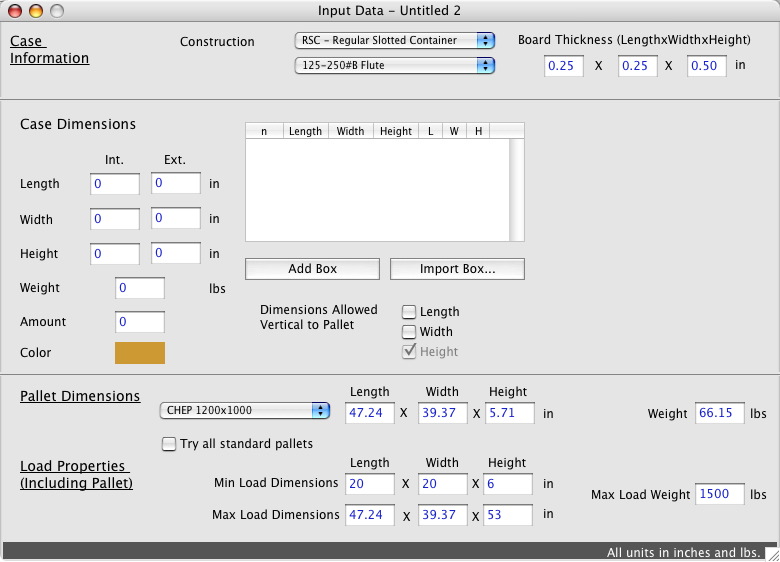
| The first step is to open a new document window starting from box dimensions and set the units appropriately. |
 |
| Then, we go to the spreadsheet or text file that contains the tab-delimited data. It is important for this data to contain the following columns: Unit, Type, Length, Width, Height, Weight, Color, Amount, Code (optional) and Description. The unit value can be equal to 0 (mm/kg), 1 (cm/kg) or 2 (inches/lbs). The type is always equal to 1. The color format is similar to HTML color formatting (#RRGGBB), where the Red (RR), Green (GG) and Blue (BB) values are Hexadecimal values. The rest of the dimensions are entered using the appropriate unit. QPM will translate the dimensions if the copied units are different from the units in the input window. Please note that if the input window uses "commas" for separating decimals, |
 |
| The next step is to copy and paste the data onto the input window. QPM will translate the dimensions if the copied units are different from the units in the input window. Please note that if the input window uses commas (",") for separating decimals, the pasted data will too need to use commas. Select the pallet type and other constraints as necessary. |
 |
| In this case, we used the "Calculate Multiple Boxes" feature from the Tools menu to obtain the mixed boxes and pallets. |
 |
| Top |
|
Filling Boxes Using Default Data
| This is a quick example on how to use the box fill feature with the default data. This feature uses the primary package dimensions and fits them into the standard cases that have been edited previously. In this example, we will use the default cases in English units. Therefore, the first step is to open a new document window starting from Primary Package dimensions. |
 |
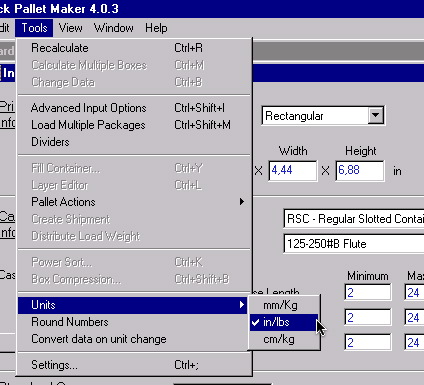
| The next step is to change the units to inches and pounds. Otherwise, we would need to add the height to the default standard cases with metric units (box fill will not work unless the standard cases have all three dimensions). |
 |
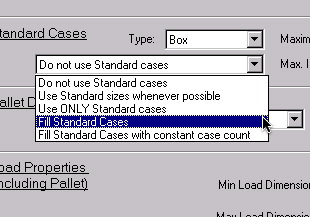
| Once that has been done, we will select the "Fill Standard Cases" item in the Standard Cases menu. This item will tell Quick Pallet Maker to place as many packages it can into the predetermined cases taking into account the maximum slack limitations to the right of the menu. |
 |
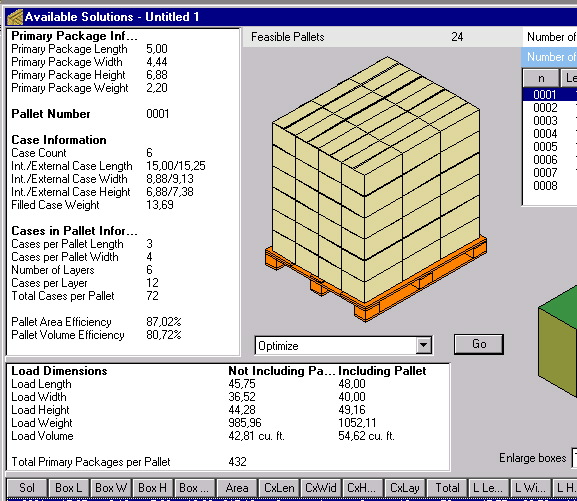
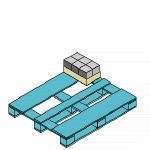
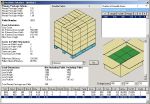
| The next step is to select "Recalculate" from the Tools menu. This will first calculate the box fill and then calculate the pallet arrangements for the predetermined boxes. The attached screenshot at right shows one of the solutions. Note that the default standard English unit cases fit better in the 48"x40" pallets than in the other default pallets. |
 |
| Top |
|
Filling Standard Boxes with Multiple-Sized Packs
Starting from QPM version 4.1, users can fill standard-sized cases with packages of different sizes. In this example, an online bookstore needs to find which one of its standard case sizes is the best one for shipping.
A customer of theirs orders four books.
- The first one measures 7" wide x 10" high x 3" depth and weighs 0.8 lbs.
- The second one is the same size and weight.
- The third book measures 6.5" wide x 11" high x 5" depth and weighs 1.5 lbs.
- The fourth book is smaller and measures 5" x 7" x 2" and weights 0.4 lbs
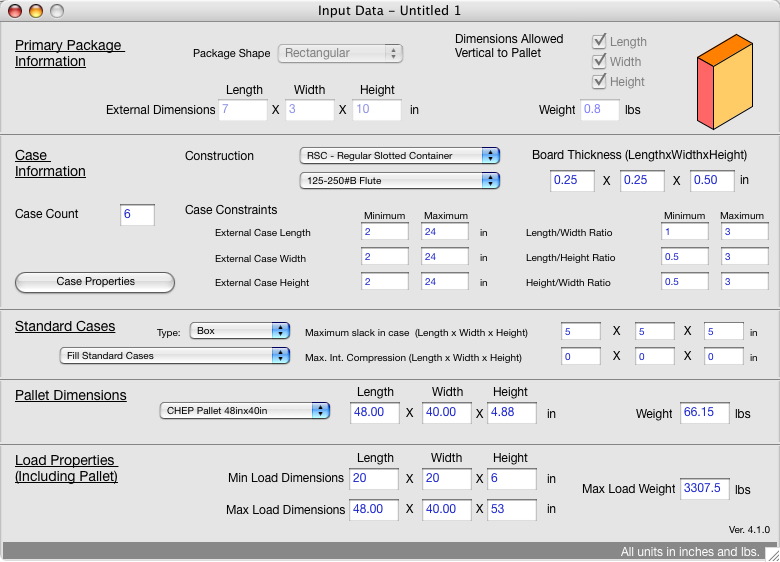
For this example, we will assume that the online bookstore's box inventory is the same as the list of default cases available in Quick Pallet Maker. Therefore, our first step is to open a new window starting from primary package dimensions. If the units are not in inches, they need to be changed by using the appropriate option from the Tools menu. |
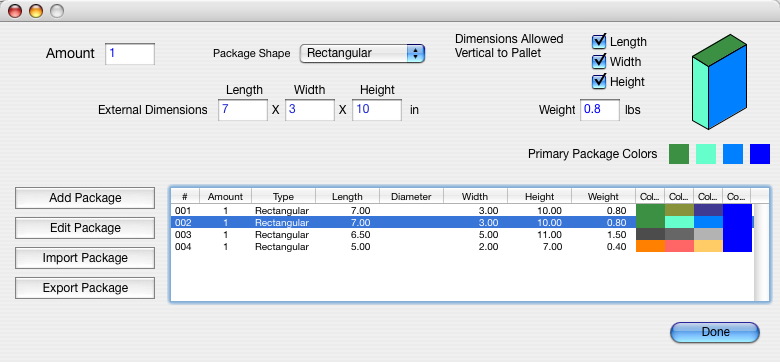
| The next step is to open the Multiple Package Input window through the Tools menu. We enter the book dimensions and assign different colors to them. Please note that the rectangular package convention in Quick Pallet Maker, the book width is the Length, the book depth or thickness is the Width and the book height is the Height. |
 |
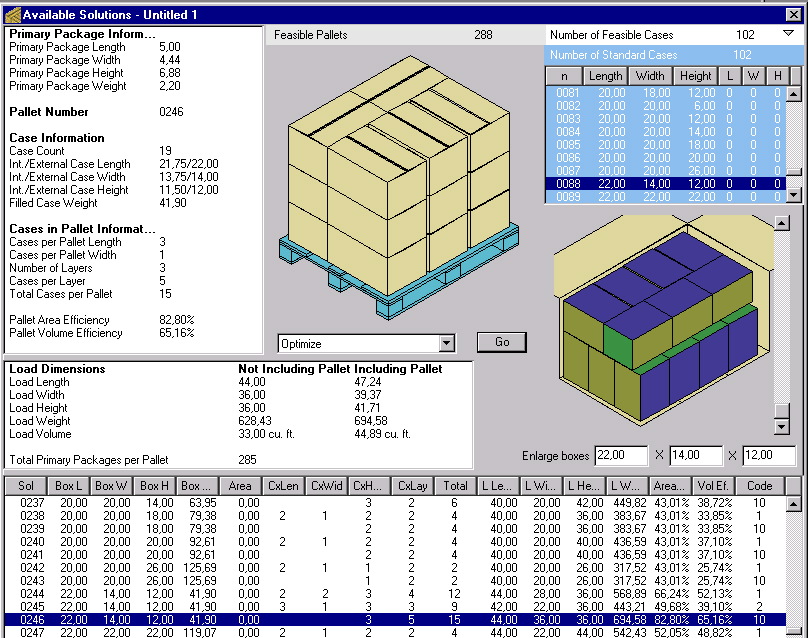
| Once we have added the four books, we change the Standard Case menu to indicate "Fill Standard Boxes", change the pallet type to CHEP 48x40 and increase the maximum in-case slack to 5 inches. When complete, we select "Recalculate" from the Tools menu to begin the calculations. This process may take a while as Quick Pallet Maker checks how the packs fit in ALL of the boxes from the list. Every time the books are fit into one or more of the standard cases, QPM will compare the volume that is taken by the needed cases and keep the option that occupies less volume. |
 |
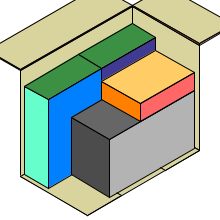
| After finishing the calculations, we learn that QPM has chosen a box with dimensions equal to 14.50"x8.75"x12.00". Note that in this case, although we did not consider padding before calculating the box dimensions, we found out that the final arrangement has enough spaces for including the bubble-packs that are commonly associated with box shipments. |
 |
| When Quick Pallet Maker calculates multi-packs, it tries to find a box to fit all the contents (as in the example). If it does, then it creates a pallet that fits as many multi-packs as possible. If it doesn't then it creates a pallet with the number of standard cases needed to complete the order. In this example, the online bookstore doesn't need to ship a pallet full of boxes with four books. Hence, only the open box drawing or movie will be necessary for showing to those that fill the boxes manually. |
 |
| The package file with the book list is available for download through this link. This file can be decompressed and loaded into the Multiple Package Input window by clicking on the "Load Packages" button. |
| Top |
|
|